Posts

Image
Here is a picture of the ribs roughed out, the central spine consists of two pieces (Spruce) that will later be steam bent, and glued, the top bridge is made in a similar fashion. A modern multi laminate bridge can be made cold, and will hold its shape, but with only two laminations, there would be a large amount of spring-back. Below the steaming/laminating form takes shape out of layers of plywood, one side is a single piece attached to a stationary base, the remaining being individual movable blocks. The offset between the blocks is 30 mm, which is the width of the bridge before final shaping. Above the sides of the steam box before assembly, the box is eight feet long, by about six by six inches, just large enough to accommodate the long thin strips of the bridge and spine. Below; the box assembled. The parts to be bent are suspended on a row of half inch Maple dowels that span the interior of the box allowing the steam to penetrate from all sides. Steam comes from a ...
Image
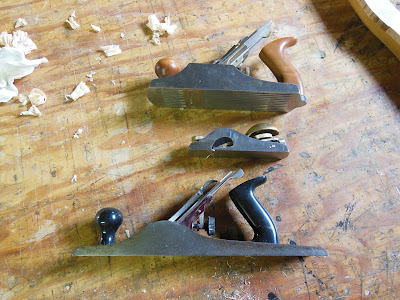
Here are three hand planes that I use most often. The plane on top is a smoothing plane with a higher angle blade, fifty degrees, this helps reduce tearing on figured wood. The sole of this plane is corrugated which reduces suction on very smooth, planar surfaces. In the middle a little rabbeting, low angle block plane good for a lot of things, and good on end grain. The bottom plane is an inexpensive, old, but not antique, Stanley jack plane, that is re-sharpened with a convex curve in the iron, and with addition of small teeth. I use this plane for rough hogging or scrubbing of material. In the photo below you can see three soundboard panels in the drying room, the panel on the left shows the surface produced by this tool. Photo below, detail of the surface, the curvature of the iron allows more material to be removed at a pass, while the teeth minimize tear-out. This panel is in the first stage of thicknessing. The panel in the middle has its final thickness, and is rough s...
Image
The planing sled, above, is a simple jig which allows uneven, or thin stock to be passed through the planer. In this case the work is shimmed up on one side so that a taper may be machined. Above, the planing sled and part passing through the machine. Below, the resultant taper. After some manual touch up the shelf is temporarily installed in the piano, at this point the piece fits snugly, which is far to tight as there will be a layer of Planetree veneer on both the top and bottom.
Image
Some stages in the making of the lower shelf of the pin-block stretcher assembly. Although I had originally intended to make this piece of the same construction as the original, I have been unable to obtain wood that satisfies me as to grain orientation. Above; a couple of five quarter, flat sawn German Beech planks, which in the lower photo have been re-sawn, and turned so that their radial faces are uppermost. Below; the six pieces glued together, the adhesive is Urea Formaldehyde, which is not reversible. This type of construction is more stable than the original, which, although being radially sawn, was very badly twisted in service. I can't help but feel that this was due to more than just the pull of the strings. The finished panel, jointed and planed up oversize. In its final incarnation this piece is tapered in longitudinal section, and tapered, bass to treble, in plan view. Below, the panel is planed to the major thickness, before tapering, and cut to the plan ...
Image
Although I have made quite a few sound-board panels using AR glue (see above) this will be my first using hide glue, so I'm going to approach it rather timidly, and joint and glue the panel one piece at a time. Otherwise, as I generally work alone, I would construct a heated table, if I were not too lazy, and proceed at leisure. The panel for the Erard has only seven pieces, the same as the original, so this method won't take very long.  Above, an intermediate step. The final two pieces, you can also join them in pairs, as shown below. The panel rough trimmed, and cleaned up, a bit, but not leveled, the thickness at this stage is around 10 mm. Final thickness will vary from 5.5 to 7 mm, before final thicknessing the panel will sit in the hot room for two weeks and shrink down. The hot room is set at 26% RH. In gluing up large panels out of individual boards, good woodworking practice usually dictates that heart wood should be joined to heart wood, and sap wood to s...
Image
As I will be gluing the sound-board together in this next step, it seems an appropriate place to stop and talk a little bit about glue. Many restorers and conservators talk very negatively, and vehemently so, about AR, or Aliphatic Resin, glues. One major complaint about this type of glue is that it creeps, and that joints under constant stress will eventually fail. In thirty years of cabinet making, over ninety modern sound-boards, and two new modern instruments, one weighing over 2000 lbs., I have yet to see a single joint fail as a result of creep, although I am well aware that there are others who do not share this experience. In every case where I have replaced a modern sound-board, the original board failed as the result of the use of animal glues. One other often cited problem is that joints made with AR glues are not invisible. Let me assure you, that properly constructed joints assembled with AR glue, are as invisible as they would be with any other adhesive. Having said ...
Image
I no longer joint sound-board panels with the machine, ultimately the hand plane does a better job. Unlike the hand plane, the machine Jointer produces a series of little scoops, the frequency of which depends on the feed rate of the work. A dull machine also tends to crush the wood cells, rather than cutting through them, which can cause a poor glue joint. At least one manufacturer of pianos is still jointing sound-board panels this way. In the first picture you can see the very simple jig, or shooting board, that I use for jointing thin boards. On some, more traditional shooting boards, there might be a wooden hook at one end to hold the work. My jig uses small C-clamps (see below). With the work clamped in place the board can be planed with the long, 24 inch, jointer plane. This keeps the edge square, and saves the worker the trouble of balancing the plane on the thin edge of the board, were it clamped vertically.  How force is applied to the hand plane, determines ...
Image
Rough ripping at the band saw, in this case to remove some sap wood on one of the wide boards, the boards are then jointed on one side in preparation for re-sawing to thickness, below.   Although there were only a few pieces to re-saw, I took the time to install the power feeder on the band saw. Normally I would be too lazy to do this, as the thing is quite heavy, and for some reason was living on a shelf about ten feet up. Some of the boards are pretty wide, and this spruce is fairly expensive, so the extra work is worth it, as the feeder produces very straight cuts with less waste. Above; an action shot of some of the narrower stuff. Some of the pieces after sawing, it is a good idea to have the run-out of the boards facing the same direction in the final panel. This is especially important if the panel is going to be planed up by hand. With Spruce you can do this using tape, if the tape pulls up the grain then the grain is running in the opposite direction. The b...
Image
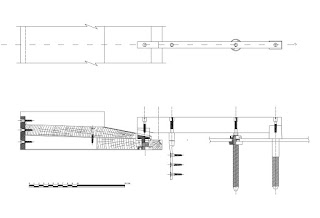
For those readers interested in technical drawings, here is a section of the instrument through the highest treble bar. Many details, of course, are missing, as this is a work in progress. This will be part of the complete drawing of the piano. I apologize for the poor quality of the preview on this page. You can download a high quality .pdf of this drawing from the data page of my Erard site. Readers interested in native file formats, .dwg, .dxf should contact me directly.
Image
Constructing a pattern of the long bridge by offsetting, using an acrylic disc. The diameter of the disc is not important, you make one offset, trim to the line, and then offset back. Below; cutting the pattern for the bass bridge, the material is 3mm 5 ply Baltic Birch. The bass bridge proper, was sawn from solid Beech, the long bridge is two vertical laminations of Beech. Neither piece is cut on the quarter, which I would normally prefer. The bridge patterns laid out on the sound-board pattern, and aligned using the fixtures made earlier. The sound-board pattern is made of the same stuff as the bridge patterns. Notice that the holes for the bolts are very oversize, they are also not strictly concentric to the bolts. These will be made smaller with overlapping wooden washers, and aligned with the bolts in place. Some Spruce (below) for sound-boards. Wide stuff on the bottom is around 12", 300mm. I will split these on the band saw, two, or three ways, to end up with 6 x ...
Image
In the collection at Period Piano Center, we have an Erard 1844 serial# 16234, made in Paris, and one year newer than the instrument I am working on (ser# 15908). The contrast in the condition of these two instruments is useful for illustrating some points I would like to make about the uses, and usefulness of conserving and restoring nineteenth century pianos. We usually think of these terms, conserving and restoring, as being antithetical, but this depends on which qualities we are conserving or restoring. In both cases information is lost, but also in both cases information is discovered, which would not have been, had the instrument remained otherwise unmolested. Some conservators speak about the desire to be able to play an instrument somewhat dismissively, forgetting that playing is an important facet of the study of an instrument, and not simply entertainment. The Erard no. 16234 is an example of an instrument I would not touch. Although not playable, it is in otherwise orig...
Image
Here are some better shots of the board, front and back, so that you can see the bridge, and rib structure. I have made quite a few modern soundboards, but none like this. The panel, as I said before, is about 5mm thick, with no appreciable taper that I can detect so far. Grain orientation of the panel is longitudinal, the individual boards are wide, some over 300mm, which means that, although they were cut from large trees, there is a large variation in grain frequency within a single board, the exception being the treble, where the boards are narrower, and the grain tighter. In the extreme bass, however, the grain width exceeds 3mm. Although the many of the ribs have, close to, modern widths, none stand much above 13 or 14mm. The ribs are widely spaced, except in the treble, where they are closer together, and very small. Where a rib intersects with the central spine it is mortised into the spine. The four ribs in the middle of the board pass through the spine, the joint there b...
Image
Before I can remove the sound-board, I have to make a set of patterns to record the position of the bridges. I would do this even if I were not replacing the board. The patterns are made of Baltic Birch plywood and are registered to marks on the inside of the case. I put the piano on its side on the skid-board, so that I have access to both sides. At first I thought steaming might be a good way to go, but the belly rail section came off fairly easily, as the glue was somewhat dehydrated. I ended up soaking the straight side. In hindsight steaming would have been the better idea. Below is the board almost out. I apologize for the poor quality of the photos so far on this post, by the time I checked them it was too late. Here are some better ones, I hope. The thickness of the sound-board panel varies from 5.5mm to a little under 7mm. The curved longitudinal rib is laminated, vertically, from two pieces, the joint is barely visible. I don't know if they heated or steamed...