Posts

Image
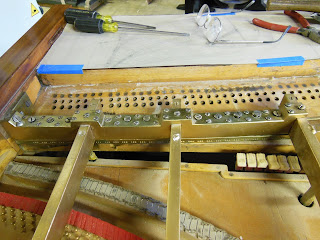
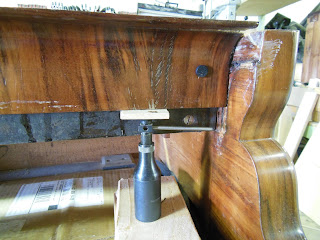
Here is a front view of the stretcher fascia, being slowly jacked up and out of the instrument. Behind it you can see the iron bar, which is actually quite large and heavy, and is secured by a somewhat motley assortment of screws, in an odd arrangement. Above, the iron bar revealed. This is sort of like putting the pin-block flange, behind the pin-block. Erard was not the only one to do this. the remaining plate strut projects all the way through the stretcher and contacts the bar, without actually being attached to it. A closeup of one end of the iron bar, showing also the groove into which the spline of the fascia fit. This groove is about 1/8" deep, and is cut just through the veneer, which is very thick in this area. The name stamped on the back of the bar (CHATILLON.SS)
Image
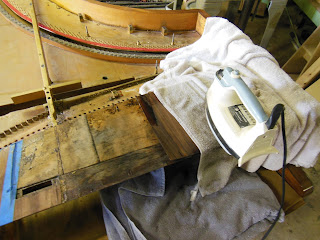
Now the veneer can start to come off the top of the stretcher assembly. I used to be terribly afraid of this, but the trick is not to use a hot iron. Instead set the iron on the lowest setting, so that the temperature gradient is not too great, and the glue has a chance to get warm before outside burns. I use a clean wet, but not sopping, towel between the iron and the veneer, and, of course, the veneer has been stripped of finish. If you want to preserve the finish this is not the method. Plenty of patience is required, which with me, is always in short supply. Use a spray bottle of water and keep the towel wet. When the veneer begins to loosen work a thin, but not sharp blade underneath. The backs of the removed pieces are washed with hot water to remove any remaining glue, and then packed between clean paper toweling and put under pressure. Now we can see that the top of the stretcher is made of several pieces, with small slips of veneer between them, and that one of t...
Image
Here is one of the two fellows I mentioned earlier. Each of these was cast in two parts out of Bronze, and machined. One has to admire the level of effort that went into making and installing them, all for naught . The agraffes, also pictured here, are all too badly damaged to be reused. They were all drilled out, in place, to accommodate  larger modern wire. All the string lengths, the strike line spacing, and the string heights were recorded, before the instrument was unstrung. For those of you more fastidious than me, I did keep the wire and the pins, although they are modern, just to have a record, and to know the string tension on the instrument when it first arrived.
Image
But wait, I have forgotten about the Barre Harmonique, an important invention of Erard, and precursor of the modern Capo-bar. This had to be removed before the plate struts. Let's examine this bar more closely. Unlike the modern Capo, this bar is made in two parts. The lower part, which is the actual termination piece, has the cross section of an L lying on its back. The short vertical leg is pierced to form the termination, and the long leg is screwed to the shelf. The upper part is a massive block of Brass machined to fit over the plate struts. This block is secured using three classes of screws. see below, The large screws that run down the center of the bar, are wood screws that pierce the termination piece and thread into the shelf. The center screws above the struts are machine screws that thread into the struts. The remaining screws along the edges of the bar, are machine threaded into the upper bar itself, and bear against the top of the termination piece. Why the t...
Image
Before I can start to remove the pin-block, I would like to remove all the plate struts, except the center strut which is built into the stretcher. To do this I must cut apart the welded-in cross bars which are not original to this piano. In the photo above, the sound-board is protected with cardboard, and thin plywood before the bars are cut apart with a Sawzall. This is brutal work, and thankfully takes only a few minutes. The plate struts are screwed into the piano. On the hitch-pin panel they rest on, and are screwed to steel stanchions (stand-offs). These small blocks of metal form the head of a bolt which passes through the hitch-pin panel and into the inner rim. In the front there is a similar arrangement, with small metal blocks, whose lower part forms a machine screw that passes through the shelf, and is secured from below with a round nut. Between these are a series of nose, or pillar bolts, that pierce the sound-board, and likewise through the strut, then being ret...
Image
Most of the obvious damage to this instrument is in the pin-block area. The pin-block in this Erard is built of three layers of Beech. The first layer, which I will call the shelf, is a tapered board, consisting of two pieces edge glued together, with its thick edge towards the front of the instrument. The second layer is the pin-block proper. Like the shelf, the grain of the pin-block runs side to side, rim to rim, but while the shelf has one joint parallel to the grain, the pin-block has joints perpendicular to the grain, and is screwed, as well as glued to the shelf. The third layer is the stretcher, which has decorative veneer (Courbaril) on its upper surface. All three layers extend to the front of the assembly, but only one, the shelf, is mortised into the rim on each side. The other layers simply sit on the shelf, and between the sides of the instrument. My miserable description will become more clear when we start to take apart the instrument, as the entire pin-block stre...
Image
Let's start with the general condition of the instrument. The Erard log books says this instrument was built in 1843, and is veneered with Courbaril, which is a south American hardwood similar to Rosewood. The present condition of the case is good, although it was recently refinished with nitro-cellulose lacquer, which is decomposing. In many places the veneer shows signs of telegraphing, which indicates movement of the structure beneath. The treble corner, visible in this photo, shows a slight change in elevation, The log book also tells us that the piano originally had six bars. A close look at the photo above shows 7 bars, the bar in extreme bass was added more recently, probably sometime in the 1990's. The four transverse bars, which are welded in are also a recent addition. In the above photo we see two of the more interesting additions to this instrument. Two clamps which although ugly, and out of place, appear to have been cast and machined from Bronze, which s...